Chocolate Peanut Butter Lava Cookies: Molten Center
- Time:20 minutes active + 90 minutes chilling = Total 3 hours 2 mins
- Flavor/Texture Hook: Velvety cocoa exterior with a molten, salty sweet peanut butter center
- Perfect for: Holiday dessert platters, date nights, or a high impact treat for chocolate lovers
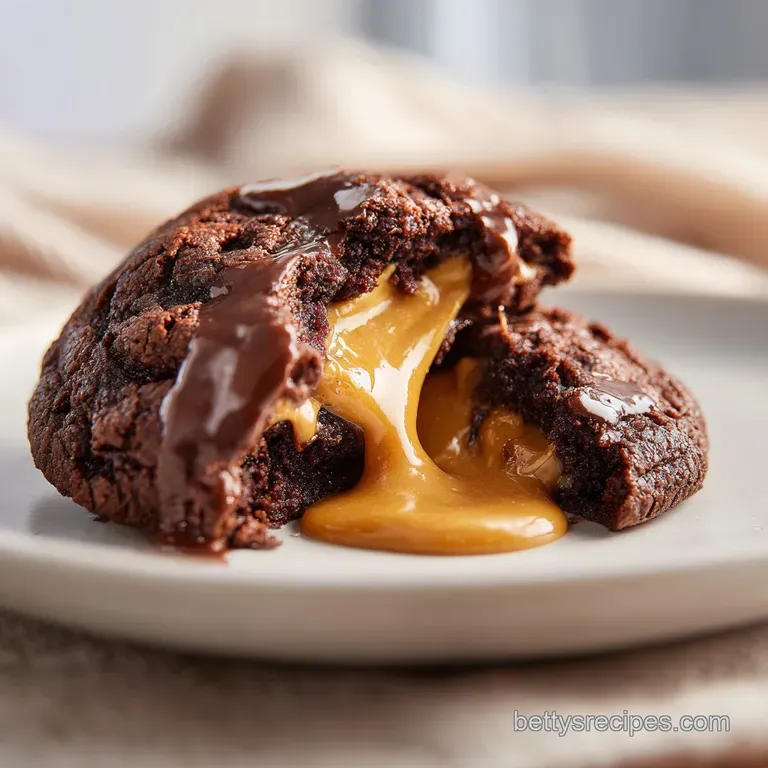
- Chocolate Peanut Butter Lava Cookie with Gooey Surprise
- Secrets Behind the Gooey Center
- Ingredient Component Analysis
- Essential Kitchen Tools
- Flavor Swaps and Tweaks
- Step-by-Step Baking Guide
- Fixing Common Baking Errors
- Adjusting the Batch Size
- Baking Truths and Misconceptions
- Storage and Zero Waste
- Plating and Serving Tips
- Recipe FAQs
- 📝 Recipe Card
The smell of melted cocoa and toasted peanuts hitting the air is enough to bring anyone running into the kitchen. There is something about the way the chocolate aroma fills the room that feels like a warm hug from my grandmother, though she never would have dreamed of putting a "lava" center in her cookies.
I remember the first time I tried to hide a filling in a cookie, it just leaked out and made a mess of my baking sheet.
That mess taught me the most important rule of the molten center: temperature is everything. You can't just put room temperature peanut butter in dough and expect it to stay a distinct "blob" of goodness. It will just blend into the dough. The trick is the deep freeze.
When that frozen core hits the oven heat, the outside of the cookie bakes through while the center slowly thaws into a velvety liquid.
Learn how to make the ultimate Chocolate Peanut Butter Lava Cookie with Gooey Surprise. We are talking about a treat that looks like a standard thick cookie but reveals a molten heart the moment you break it open.
It's the kind of baking that makes people think you spent hours on a complex pastry project, but honestly, it's just about timing and a little bit of patience with your freezer.
Chocolate Peanut Butter Lava Cookie with Gooey Surprise
The magic here is all about the structural integrity of the cocoa dough. If the dough is too thin, the peanut butter will burst through the sides like a volcano. If it's too thick, you'll have a cakey cookie with a cold center.
We are aiming for a specific fudgy consistency that supports the weight of the core without becoming a bread roll.
I've found that using brown sugar instead of just white sugar gives us that chewy, bendy texture that wraps around the peanut butter core perfectly. It creates a slight caramel note that bridges the gap between the bitter cocoa and the salty peanut butter.
Trust me on this, don't skip the maple syrup in the core, it keeps the peanut butter from becoming too grainy when it freezes.
This recipe isn't about speed, it's about the payoff. While we have a few waiting periods, the active work is minimal. It's a great way to get that high end bakery feel at home without needing professional equipment.
Just a couple of bowls and a bit of fridge space, and you're set for a treat that genuinely wows people.
Secrets Behind the Gooey Center
The Thermal Barrier: The frozen peanut butter core acts as a heat sink, slowing down the cooking process in the center of the cookie while the exterior reaches the target temperature.
Sugar Hydration: The combination of maple syrup and powdered sugar in the core prevents the peanut butter from separating or becoming dry during the freeze thaw cycle.
Structure Support: The cocoa powder absorbs more moisture than flour alone, creating a denser, more stable wall that prevents the "leakage" common in lava treats.
Fat Stabilization: Using softened butter rather than melted butter ensures the dough holds its shape during the initial minutes of baking, preventing the cookies from flattening.
| Method | Prep Time | Texture | Best For |
|---|---|---|---|
| Frozen Core (This) | 3 hours 2 mins | Molten center, chewy edge | High impact dessert |
| Mixed in PB | 30 minutes | Uniformly soft | Quick snacking |
| PB Swirl | 45 minutes | Marbled, fudge like | Visual appeal |
Ingredient Component Analysis
The ingredients in this recipe aren't just for flavor, they are doing heavy lifting to ensure the texture stays consistent. For example, the cocoa powder isn't just for the chocolate taste, it's a drying agent that helps the dough stay thick enough to encase the core. According to Serious Eats, the type of cocoa powder can significantly change the moisture levels of your bake.
| Ingredient | Science Role | Pro Secret |
|---|---|---|
| All Purpose Flour | Provides gluten structure | Measure by weight for consistency |
| Cocoa Powder | Adds structure and depth | Sift it to avoid bitter clumps |
| Brown Sugar | Creates chewiness/moisture | Pack it tight into the cup |
| Maple Syrup | Core emulsifier | Keeps the PB core velvety |
Essential Kitchen Tools
You don't need a fancy lab to pull this off, but a few specific tools make the assembly way easier. A parchment lined plate is non negotiable for the cores, otherwise, you'll be scrubbing frozen peanut butter off your dinnerware.
A digital scale is also a huge help here because "1 cup of flour" can vary by 20 grams depending on how you scoop it.
I usually use a small whisk for the peanut butter mixture and a stand mixer such as KitchenAid for the butter and sugar. If you don't have a mixer, a hand mixer works fine, just be prepared to spend a few extra minutes beating the butter until it's truly pale and fluffy.
A small cookie scoop helps keep the dough portions consistent so they all bake at the same rate.
Right then, let's make sure you've got your ingredients ready. I've listed the swaps below if you're missing something in the pantry.
Flavor Swaps and Tweaks
For the core: - 1/2 cup (125g) creamy peanut butter Why this? Provides the signature salty, molten center - 2 tbsp (30g) powdered sugar Why this? Adds sweetness without adding bulk - 1 tbsp (15ml) maple syrup Why this? Ensures a
Smooth, non grainy texture - 1/4 tsp (1.5g) salt Why this? Cuts through the richness of the PB
For the chocolate dough: - 1/2 cup (115g) unsalted butter, softened Why this? Essential for a tender, chewy crumb - 3/4 cup (150g) brown sugar, packed Why this? Gives that classic bakery chew - 1 large egg (50g) Why this? Binds the
Dough and adds lift - 1 tsp (5ml) vanilla extract Why this? Enhances the chocolate notes - 1 cup (125g) all purpose flour Why this? Basic structure provider - 1/3 cup (35g) unsweetened cocoa powder Why this? Deep chocolate
Flavor and stability - 1/2 tsp (3g) baking soda Why this? Helps the cookies spread slightly - 1/4 tsp (1.5g) salt Why this? Balances the sugar - 1/2 cup (85g) semi sweet chocolate chips Why this? Adds pockets of melted
Chocolate
| Original Ingredient | Substitute | Why It Works |
|---|---|---|
| Maple Syrup (1 tbsp) | Honey (1 tbsp) | Similar viscosity. Note: Honey is stronger; may slightly alter the PB taste |
| All Purpose Flour | Almond Flour (1:1) | Low carb alternative. Note: Will be much softer and more fragile |
| Semi Sweet Chips | Dark Chocolate chunks | Deeper flavor. Note: Less sweet overall result |
| Creamy PB | Almond Butter (1/2 cup) | Nutty alternative. Note: Lighter flavor than peanut butter |
If you love these kinds of decadent treats, you might also enjoy my Chocolate Swiss Roll Cake for a different kind of chocolate experience.
Step-by-step Baking Guide
Preparing the Lava Cores
- Combine peanut butter, powdered sugar, syrup, and salt in a bowl and whisk until smooth. Note: Make sure there are no sugar lumps
- Drop 6 small dollops (about 1 tbsp each) of the peanut butter mixture onto a parchment lined plate.
- Place the peanut butter dollops in the freezer for at least 60 minutes until they feel firm to the touch.
Crafting the Chocolate Dough
- Beat the softened butter and brown sugar together until the mixture is pale and fluffy. Note: This incorporates air for a better texture
- Mix in the egg and vanilla extract until fully incorporated.
- In a separate bowl, whisk together the flour, cocoa powder, baking soda, and salt. Note: Sifting the cocoa here prevents clumps
- Slowly stir the dry ingredients into the wet mixture until a thick dough forms, then fold in the chocolate chips.
Assembling and Baking
- Flatten a golf ball sized portion of chocolate dough into a disc in your palm and place a frozen peanut butter ball in the center.
- Fold the dough over the core and pinch the seams shut until no peanut butter is visible. Note: A leak here means a leak in the oven
- Place assembled cookies on a baking tray and refrigerate for 30 minutes.
- Bake at 350°F (175°C) for 10-12 minutes until edges are set but centers remain slightly soft.
Chef's Note: Don't be tempted to overbake these. They will look slightly underdone in the middle when you pull them out, but they'll firm up as they cool. If they look "done" in the oven, the center might be too solid.
Fixing Common Baking Errors
The most common issue people have with the Chocolate Peanut Butter Lava Cookie with Gooey Surprise is the "blowout," where the peanut butter leaks out the side during baking. This usually happens because the core wasn't frozen long enough or the dough wasn't sealed tight enough.
If the core is too soft, it melts faster than the dough can set, creating a hole.
Another struggle is the "solid center," where you bite in and it's just a firm lump of peanut butter. This is almost always caused by overbaking. Since we are using a frozen core, the heat takes a while to penetrate. If you bake them until the whole cookie is firm, you've effectively cooked the core.
Why Your Cookies Leak
If you see peanut butter pooling on your tray, check your seal. Ensure you are pinching the dough completely shut around the frozen ball.
Why Your Center Isn't Molten
This is usually a timing issue. If you leave them in for 15 minutes instead of 12, the core will solidify.
| Problem | Root Cause | Solution |
|---|---|---|
| Core Leaks Out | Poor seal or under frozen core | Freeze cores 60+ mins; pinch seams tightly |
| Flat Cookies | Butter too soft or over mixed | Chill assembled cookies for 30 mins before baking |
| Grainy Center | Powdered sugar not mixed in | Whisk PB mixture more thoroughly |
Common Mistakes Checklist
- ✓ Did I freeze the PB balls for a full hour?
- ✓ Is the butter softened but not melted?
- ✓ Did I pinch the seams of the dough completely shut?
- ✓ Did I refrigerate the assembled cookies before baking?
- ✓ Did I pull them out while the centers were still soft?
Adjusting the Batch Size
If you're just making these for yourself and don't need 6 massive cookies, you can scale this down. To make a half batch (3 cookies), you'll need to handle the egg carefully. Crack one egg into a bowl, beat it, and use exactly half of it (about 25g).
Use a smaller baking sheet and reduce the baking time by about 20%, as there's less mass in the oven.
For a double or triple batch, don't just multiply the salt and baking soda linearly. I recommend using only 1.5x the salt and baking soda for every 2x of the other ingredients to avoid a metallic taste.
Work in batches when assembling and chilling, as overcrowding your fridge can raise the temperature and prevent the dough from setting properly.
For the baking process, if you're doing multiple trays, lower the oven temp to 325°F (160°C) and extend the time by 2-3 minutes. This ensures the heat distributes evenly across both racks without burning the bottom tray.
If you're in the mood for something different, my Soft Maple Cookie is a great alternative if you want something less rich but still comforting.
Baking Truths and Misconceptions
Some people believe that using melted butter makes for a fudgier cookie. While it does create a denser texture, it also makes the dough much harder to work with when you're trying to wrap it around a frozen core. Melted butter often leads to "puddling" on the baking sheet, which ruins the lava effect.
Stick to softened butter for the best structural support.
Another myth is that you should let the cookies cool completely before eating. For a lava cookie, the opposite is true. While you want them to set for 5-10 minutes so they don't fall apart, you want to eat them while the center is still molten.
If you let them get cold, you lose that velvety, liquid surprise.
Finally,, some think that adding more flour will stop the cookies from spreading. While flour adds structure, too much of it will make the cookie cakey and dry. The secret to preventing spread isn't more flour, it's the 30 minute refrigeration period after assembly.
Storage and Zero Waste
These cookies are best fresh, but you can absolutely store them. Keep them in an airtight container in the fridge for up to 5 days. To get the molten center back, don't use a microwave on high, as that will dry out the dough.
Instead, pop them in a 300°F (150°C) oven for 5 minutes.
For long term storage, I recommend freezing the cookies after they have been baked and cooled. Wrap them individually in parchment paper and toss them in a freezer bag for up to 2 months.
To reheat from frozen, just bake them at 350°F (175°C) for about 8-10 minutes.
As for zero waste, if you have a bit of peanut butter mixture left over from the cores, don't throw it away. It's basically a rich peanut butter frosting. You can swirl it into a bowl of Greek yogurt for a high protein snack or use it as a dip for apple slices.
If you have leftover cocoa dough, you can roll it into tiny balls and bake them as mini chocolate bites.
Plating and Serving Tips
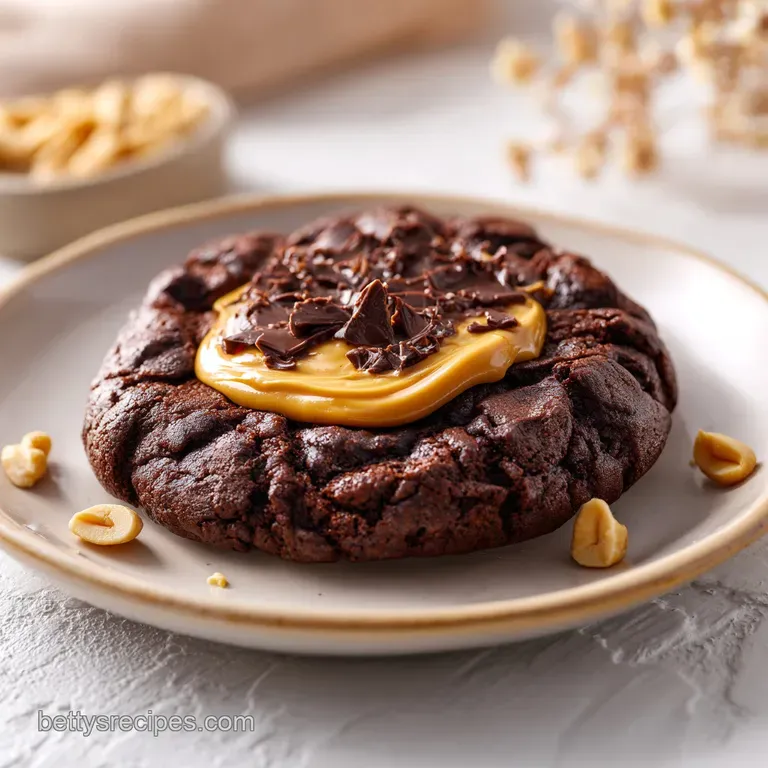
To really lean into the "occasion" feel, serve these on a dark slate board or a white ceramic platter to make the chocolate pop. I love to dust the tops with a tiny bit of powdered sugar or a sprinkle of flaky sea salt right after they come out of the oven. The salt really makes the peanut butter flavor sing.
Pair these with a glass of cold milk or a strong espresso. The bitterness of the coffee cuts through the richness of the Chocolate Peanut Butter Lava Cookie with Gooey Surprise perfectly. If you're serving these at a party, place a small scoop of vanilla bean ice cream on the side.
The contrast of the cold ice cream against the molten center is pure bliss.
For a more sophisticated look, serve one cookie in the center of a plate and drizzle a little bit of melted dark chocolate or salted caramel around the edges. It turns a simple home baked treat into something that looks like it came from a professional kitchen.
Just make sure you tell your guests to break them open with a spoon to see that gooey surprise!
Recipe FAQs
Can I reheat these cookies in the microwave?
No, avoid the microwave. High heat dries out the dough; instead, use a 300°F (150°C) oven for 5 minutes to restore the molten center.
How to prevent the peanut butter center from leaking?
Pinch the seams firmly shut. Ensure the chocolate dough completely envelops the frozen peanut butter ball before placing it on the baking tray.
Can I use a different flour for this recipe?
Stick with all-purpose flour for the best structure. If you enjoyed managing the consistency of this thick dough, you can apply similar dough handling skills to our no yeast flatbread.
Is it true I can skip the 30-minute refrigeration step?
No, this is a common misconception. Skipping the chill time causes the cookies to spread too quickly, which ruins the lava effect.
Why are my cookies coming out too flat?
Ensure the peanut butter balls are frozen for at least 60 minutes. If the core is too soft, it melts too quickly in the oven and causes the cookie to collapse.
Can I use milk chocolate chips instead of semi sweet?
Yes, you can. It will make the cookies sweeter, though semi sweet chips provide a better flavor contrast to the salty peanut butter.
How to freeze these cookies for later?
Wrap cooled cookies individually in parchment paper. Store them in a freezer bag for up to 2 months and reheat at 350°F (175°C) for 8-10 minutes.
Chocolate Peanut Butter Lava Cookies

