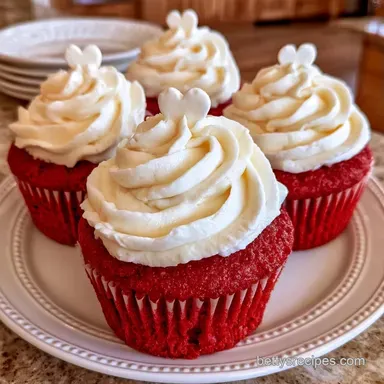
Red Velvet Valentines Cupcakes

- Time: 15 min active + 20 min baking + 60 min cooling
- Flavor & Texture: Mild cocoa with a velvety crumb and tangy cream cheese frosting
- Perfect for: A thoughtful homemade gift or a romantic dessert
Valentines Day Cupcake with Red Velvet
The heart of this recipe is the red food coloring. To get that deep, romantic crimson instead of a bright neon pink, we balance it with a small amount of cocoa powder. This doesn't make it a chocolate cake, but it adds a depth that keeps the sweetness in check.
You can expect a sponge that stays moist for days and a frosting that holds its shape perfectly for piping. It is a classic combination that looks impressive but relies on basic pantry staples.
These cupcakes are a great way to show some effort without spending the whole day in the kitchen. Once you have the batter mixed, the rest is just waiting for them to cool before adding the finishing touches.
Quick Recipe Specs
These numbers help you plan your afternoon. Just remember that the total time includes the full hour needed for the cakes to cool, which is a must if you don't want your frosting to melt into a puddle.
- Yield: 22 cupcakes
- Oven Temp: 350°F (180°C)
- Bake Time: 18-22 minutes
- Cooling Time: 1 hour 5 minutes
Ingredient Deep Dive
- 2 ½ cups (310g) all-purpose flour
- 1 ½ cups (300g) granulated sugar
- 1 tsp (5g) baking soda
- 1 tsp (6g) salt
- 2 tbsp (15g) unsweetened cocoa powder
- 1 cup (240ml) buttermilk, room temperature
- 2 large eggs, room temperature
- 1 ½ cups (350ml) vegetable oil
- 1 tbsp (15ml) red food coloring
- 1 tsp (5ml) white distilled vinegar
- 1 tsp (5ml) vanilla extract
- 8 oz (225g) full-fat cream cheese, softened
- ½ cup (115g) unsalted butter, softened
- 4 cups (480g) powdered sugar, sifted
- 1 tsp (5ml) vanilla extract
- 1-2 tbsp (15-30ml) heavy cream
The choice of fats and acids here is intentional. Using oil instead of butter means these cupcakes are less likely to get hard and dry when you put them in the fridge.
| Component | Purpose | Substitute Notes |
|---|---|---|
| Buttermilk | Adds tang and tenderness | Substitute with milk and 1 tbsp lemon juice. Let sit 5 mins. |
| Vegetable Oil | Keeps the crumb moist | Melted butter works but makes the cake denser and less moist when chilled. |
| Cream Cheese | Provides structural stability | Mascarpone is a good swap for a richer, less tangy taste. |
| Vinegar | Reacts with soda for lift | Apple cider vinegar works as a direct 1:1 swap. |
Gear You'll Need
While you can manage with basics, these tools make the decorating process much simpler.
- Medium cookie scoop: This ensures exactly 3 tablespoons per liner for a uniform bake.
- Sifter: Sifting is essential because cocoa powder frequently lumps.
- Piping bag and tips: Use a small round tip to achieve the heart designs.
- Wire cooling rack: Necessary to avoid soggy bottoms.
Bringing It Together
For the Red Velvet Sponge
- Preheat your oven to 350°F (180°C) and prepare cupcake pans with paper liners.
- In a medium bowl, sift together 2 ½ cups (310g) all-purpose flour, 1 ½ cups (300g) granulated sugar, 1 tsp (5g) baking soda, 1 tsp (6g) salt, and 2 tbsp (15g) unsweetened cocoa powder.
- Beat 1 ½ cups (350ml) vegetable oil and 2 large eggs in a large bowl until smooth. Stir in 1 cup (240ml) room-temperature buttermilk, 1 tbsp (15ml) red food coloring, 1 tsp (5ml) white distilled vinegar, and 1 tsp (5ml) vanilla extract.

- Gradually blend the dry ingredients into the wet mixture in three separate additions. Mix on low speed until just combined. Note: To prevent a tough cake, stop mixing as soon as the flour is incorporated.
- Use a medium cookie scoop (approximately 3 tbsp) to fill each liner about 2/3 full.
- Bake on the center rack for 18–22 minutes until a cake tester poked into the middle is clean or reveals just a few moist crumbs.
- Let the cupcakes cool in the pan for 5 minutes, then move them to a wire rack to cool completely for 1 hour before frosting.
For the Cream Cheese Frosting
- Cream together 8 oz (225g) softened full-fat cream cheese and ½ cup (115g) softened unsalted butter until light and fluffy.
- Gradually beat in 4 cups (480g) sifted powdered sugar and 1 tsp (5ml) vanilla extract. If necessary, add 1-2 tbsp (15-30ml) heavy cream for a smooth, glossy finish.

Decorating Levels
Depending on your schedule, you can choose a specific look. In truth, the simple version is just as delicious.
| Level | Method | Visual Result |
|---|---|---|
| Simple | Single swirl with red sugar | Homey and sweet |
| Polished | High spiral peak + 1 raspberry | Professional bakery look |
| Restaurant | Piped hearts + fresh berry | Stunning and romantic |
- Fill a piping bag with frosting and pipe in a spiral, moving outward and upward from the center to create a high peak.
- To pipe hearts, create two small mounds side-by-side and connect them at the bottom with a 'V' shape using a small round tip.

- Garnish each cupcake with a single raspberry or a sprinkle of red sanding sugar.
If Something Goes Wrong
Baking is a bit of a science, and sometimes the humidity or the temperature of your ingredients can throw things off. If your frosting feels off, don't panic, it is usually an easy fix.
Fixing Runny Frosting
If the frosting is too soft to hold a peak, it usually means the butter or cream cheese was too warm when you started. You can save it by chilling the whole bowl in the fridge for 15-20 minutes and then beating it again.
Preventing Sinking Centers
When a cupcake sinks in the middle, it's often because the batter was overmixed. This creates too many air bubbles that collapse in the oven. Keep your mixing to low speed and stop as soon as the ingredients are combined.
Handling Color Fade
If your red velvet turns brown in the oven, you might be overbaking them. Keep a close eye on them starting at the 18-minute mark. Using a high-quality gel coloring can also help the hue stay vibrant.
| Problem | Fix |
|---|---|
| Frosting won't peak | Chill bowl 20 mins, then re-beat |
| Cupcakes are tough | Mix dry ingredients on low speed only |
| Tops are too domed | Use a scoop to ensure 2/3 fill level |
Swaps and Twists
You can tweak the flavors depending on what you have in the pantry. Just be careful with structural swaps, like the cream cheese, as that holds the frosting up.
| Original Ingredient | Substitute | Why It Works |
|---|---|---|
| Buttermilk | Milk + Lemon Juice | Similar acidity. Note: Slightly less creamy |
| Vegetable Oil | Melted Butter | Richer flavor. Note: Results in a denser crumb |
| Heavy Cream | Whole Milk | Thins the frosting. Note: Less stable for high peaks |
Chef: If you want a deeper flavor, add a pinch of espresso powder to the dry ingredients. It doesn't make it taste like coffee, but it makes the cocoa pop.
Storing Your Treats
Because of the cream cheese in the frosting, these cannot sit out on the counter for long. The frosting needs the cold to stay firm and safe.
Keep them in an airtight container in the fridge for up to 4 days. If you want to make them ahead of time, freeze the unfrosted cupcakes in a freezer-safe bag for up to 3 months. Thaw them at room temperature and then frost them fresh.
For the best experience, take the refrigerated cupcakes out about 30 minutes before serving. This lets the butter in the cake soften, which makes the texture much more tender.
Best Pairings

Since these are quite rich, I like to pair them with something that has a bit of a bite or a clean finish.
A cold glass of milk is the classic choice, but a tart raspberry coulis on the side can add a nice contrast to the sweetness. If you're serving these as part of a larger dessert spread, a bowl of fresh strawberries or a light citrus salad helps cleanse the palate between bites.
Why It Works
The magic here happens because of the acid. When the buttermilk and vinegar hit the baking soda, they create carbon dioxide bubbles that lift the heavy cocoa and flour, making the cake airy.
Using oil instead of butter is another key. Oil stays liquid at lower temperatures, so while a butter-based cake might feel stiff when cold, these stay soft and moist even after a few days in the fridge.
Good to Know
What is the total yield for one batch?
This recipe makes 22 cupcakes. Each cupcake counts as one serving.
Where should frosted cupcakes be stored?
Store them in a sealed plastic bin in the refrigerator for up to 4 days. The cream cheese frosting requires cold temperatures to stay firm and safe.
Can cream cheese frosting be too thin to pipe?
Yes, the frosting can sometimes be too soft. Gradually add more sifted powdered sugar to firm up the consistency.
How do I stop frosting from melting on the cakes?
Cool the cupcakes completely on a wire rack for 1 hour before frosting. This prevents the butter and cream cheese from melting on contact.
Is it possible to use a boxed red velvet mix?
Yes, a boxed mix is a viable alternative. It differs from this version by using pre-blended dry ingredients and different mixing proportions.
Red Velvet Valentines Cupcakes