Wendy's Chili Copycat Stovetop: Thick and Glossy
- Time:15 minutes active + 2 hours 40 mins simmering = Total 2 hours 55 mins
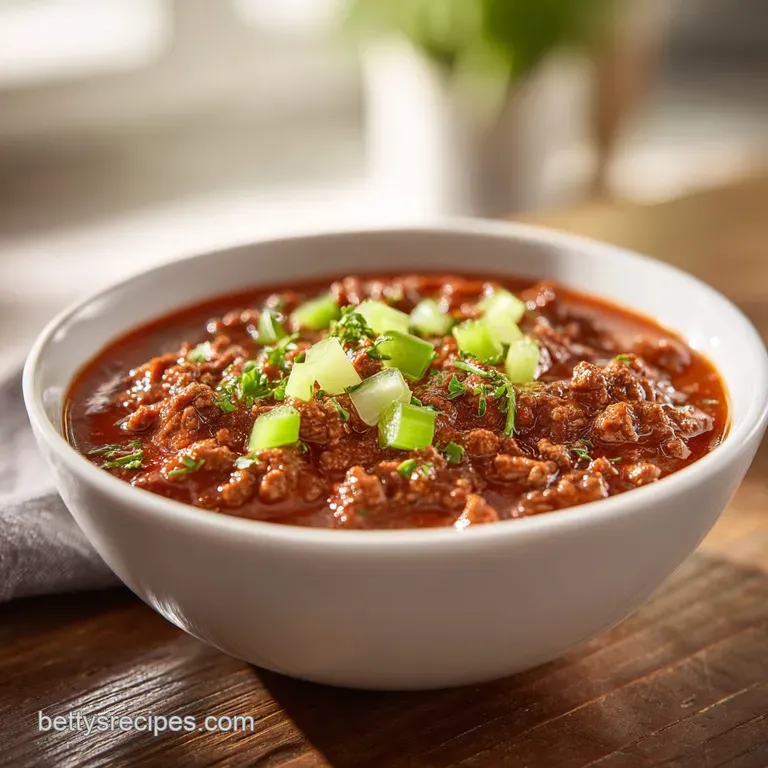
- Flavor/Texture Hook: Thick, velvety sauce with tender, mahogany seared beef
- Perfect for: Cozy Sunday meal prep or a stress free family dinner
- Wendy's Chili Copycat Recipe Stovetop
- Why This Chili Hits Different
- Ingredient Component Analysis
- Stuff You'll Need and Swaps
- How to Make It
- Pro Tips and Pitfalls
- Troubleshooting Common Issues
- Adjusting the Batch Size
- Debunking Kitchen Myths
- Storage Guidelines
- How to Serve and Enjoy
- Recipe FAQs
- 📝 Recipe Card
The loud, aggressive sizzle of ground beef hitting a hot pot is the sound of a good weekend starting. There's something about that smell onions, garlic, and searing meat that just makes the whole house feel warmer.
But let's be real, most home cooked chilis end up tasting like "tomato soup with beans" because they don't simmer long enough.
I remember making a batch a while back where I rushed the process, thinking 30 minutes was plenty. It was a disaster. The beans were floating in a thin, acidic red liquid that didn't cling to anything. It lacked that heavy, satisfying mouthfeel you get at the drive thru.
To fix that, you need a specific approach to the reduction and the beef fat.
That's where this wendys chili copycat recipe stovetop method comes in. We aren't just throwing things in a pot and hoping for the best. We're building layers of flavor through a slow and steady simmer that lets the collagen in the beef break down and the tomato sauce concentrate.
It takes a bit more time, but the difference in texture is night and day.
Wendy's Chili Copycat Recipe Stovetop
Right then, let's get into the meat of it. When you're aiming for a specific copycat flavor, you have to look at the ingredients that provide the base. The original isn't overly spicy, but it's deeply savory. It relies on a balance of sweetness from brown sugar and a rich, beefy backbone.
The secret is in the "low and slow" approach. Most people make the mistake of boiling their chili on high, which toughens the meat and leaves the sauce thin. By keeping it at a gentle bubble for nearly three hours, the liquids evaporate slowly, leaving behind a concentrated, velvety sauce that wraps around every bean and piece of beef.
Trust me on this: don't be tempted to cut the simmer time. That window between 90 minutes and 160 minutes is where the magic happens. The flavors meld, the acidity of the tomatoes mellows out, and you get that classic, hearty consistency.
It's all about patience and a heavy bottomed pot.
Why This Chili Hits Different
I've spent a lot of time wondering why some chilis feel "light" while others feel "heavy" (in a good way). It comes down to how the ingredients interact over heat. Here is the breakdown of what's actually happening in your pot:
- The Beef Brown: Searing the meat until it's deep brown creates a rich base of flavor that you can't get from gray, steamed beef.
- The Sugar Balance: A small amount of brown sugar doesn't make it sweet, but it cuts through the sharp acidity of the canned tomatoes.
- The Slow Reduction: As the beef broth and tomato juice evaporate, the natural starches from the beans thicken the sauce without needing cornstarch.
- Aromatic Softening: Sautéing the celery and peppers first removes their raw "crunch" and turns them into a savory background flavor.
Since this is a stovetop method, you have a few choices on how to handle your prep. Some people love the fresh chopped feel, while others want a shortcut. Here is how those paths differ.
| Feature | Freshly Chopped Method | Shortcut/Frozen Method | Impact on Result |
|---|---|---|---|
| Prep Time | 15-20 minutes | 5 minutes | Fresh smells better |
| Texture | Defined veggie bits | More integrated/soft | Shortcut is smoother |
| Flavor | Bright, punchy aromatics | Mellow, consistent | Fresh is more complex |
Ingredient Component Analysis
Understanding what each part does helps you tweak the recipe if you're missing something. I don't look at this as a list of rules, but as a set of tools to build a flavor profile.
| Ingredient | Science Role | Pro Secret |
|---|---|---|
| 80/20 Ground Beef | Fat and Structure | Don't drain all the fat; it carries the spice flavor |
| Brown Sugar | Acidity Neutralizer | Use dark brown sugar for a deeper, molasses note |
| Beef Broth | Liquid Base | Use low sodium so you can control the salt yourself |
| Cumin | Earthy Anchor | Toast it with the garlic for 30 seconds to wake it up |
Stuff You'll Need and Swaps
Let's talk about what's going in the pot. I've listed the exact items from my tested version, but I've included some swaps just in case your pantry is looking bare.
The Meat & Veggies
- 2 lbs ground beef (80/20 blend)Why this? The fat prevents the meat from drying out during the long simmer
- 1 medium yellow onion, finely diced
- 2 stalks celery, finely diced
- 1 medium green bell pepper, finely diced
- 3 cloves garlic, minced
The Base & Body
- 1 can (28 oz) crushed tomatoes
- 1 can (15 oz) tomato sauce
- 1 can (15 oz) kidney beans, drained and rinsed
- 1 can (15 oz) pinto beans, drained and rinsed
- 1 cup beef broth
The Seasoning Blend
- 3 tbsp chili powder
- 1 tbsp ground cumin
- 1 tsp garlic powder
- 1 tsp salt
- 1/2 tsp black pepper
- 1 tbsp brown sugar
If you need to change things up, use this table. Just keep in mind that some changes will alter that classic drive thru taste.
| Original Ingredient | Substitute | Why It Works |
|---|---|---|
| 80/20 Ground Beef | Ground Turkey (93/7) | Leaner option. Note: Lacks depth; add 1 tbsp oil for searing |
| Kidney/Pinto Beans | Black Beans | Similar texture. Note: Changes color to a darker hue |
| Beef Broth | Vegetable Broth | Liquid substitute. Note: Lighter flavor, less "beefy" |
| Brown Sugar | Honey or Maple Syrup | Natural sweetener. Note: Adds a slight floral note |
How to Make It
Right then, let's crack on. Make sure you have your pot ready. A Dutch oven is the best tool for this because it holds heat evenly and won't scorch the bottom during the long wait.
Phase 1: Browning and Softening
- Heat a Dutch oven or heavy bottomed stockpot over medium high heat. Add the ground beef and cook until it reaches a deep mahogany colored sear. Note: Don't stir too often; let the crust form.
- Drain the excess grease, but leave about 1 tablespoon in the pot. This leftover fat is where the flavor lives.
- Add the diced onion, celery, and green bell pepper. Sauté for 5-7 minutes until the onions are translucent and the vegetables have softened.
Phase 2: Building the Flavor Base
- Stir in the minced garlic and the seasoning blend (chili powder, cumin, garlic powder, salt, pepper, and brown sugar).
- Stir constantly for 60 seconds. You'll smell the spices "wake up" as they hit the fat. This is called blooming and it's a total pro move.
- Pour in the crushed tomatoes, tomato sauce, and beef broth.
Phase 3: The Low and Slow Simmer
- Stir in the kidney and pinto beans.
- Bring the mixture to a gentle boil, then immediately reduce the heat to low.
- Cover partially and simmer for at least 2 hours. Stir every 30 minutes to prevent the bottom from scorching.
- The chili is done when the liquid has reduced and the sauce is thick and glossy. If it's still too watery, remove the lid entirely for the final 30 minutes.
Chef's Note: If you're in a rush, you might be tempted to crank the heat. Don't do it. High heat breaks the beans and makes the beef rubbery. Keep it at a lazy bubble.
Pro Tips and Pitfalls

Even with a straightforward wendys chili copycat recipe stovetop, things can go sideways if you aren't paying attention to the cues. Most mistakes happen in the final hour of cooking.
Troubleshooting Common Issues
| Issue | Solution |
|---|---|
| Why Your Chili Is Too Watery | This usually happens because the lid was kept on too tight or the heat was too low to allow evaporation. You want a "simmer," not a "warm up." If it's too thin, just keep cooking it uncovered. The liq |
| Why Does It Taste Too Acidic | Canned tomatoes can be hit or miss with their acidity. If your chili tastes "sharp" or metallic, it's usually a lack of balance. A pinch more brown sugar or a tiny knob of unsalted butter stirred in a |
| Why Are My Beans Mushy | This happens if you use a slow cooker on high or boil the chili aggressively. By using a low simmer and adding the beans at the start of the liquid phase, they should stay intact but tender. |
Common Mistakes Checklist
- ✓ Searing the beef until brown, not just gray
- ✓ Leaving a small amount of beef fat for the veggies
- ✓ Stirring every 30 minutes to avoid burnt spots
- ✓ Simmering for the full 2 hours 40 mins
- ✓ Using a partially covered lid to allow steam to escape
Adjusting the Batch Size
Whether you're cooking for one or a whole football team, you can scale this. Just remember that liquids and spices don't always scale linearly.
Scaling Down (½ Batch) Use a smaller pot to prevent the liquid from evaporating too quickly. Since there's less mass, you can usually reduce the simmer time by about 20%, but keep an eye on the thickness. For the garlic, just use 2 cloves instead of 1.5.
Scaling Up (2x-4x Batch) When doubling the recipe, don't double the salt and chili powder immediately. Start with 1.5x the seasonings, then taste it during the final 30 minutes of simmering. Liquids can be reduced by about 10% because a larger pot often traps more moisture.
Work in batches when browning the beef so you don't crowd the pan and steam the meat.
If you're looking for a different kind of beefy comfort, you might enjoy my Guy Fieri Coney Sauce which uses a similar flavor base but is thicker for hot dogs.
Debunking Kitchen Myths
There are a few things people say about chili that just aren't true. Let's clear the air so you can cook with confidence.
Myth: Adding sugar makes it a dessert chili. Truth: A tablespoon of brown sugar in a 10 serving pot is barely noticeable. It simply balances the pH of the tomatoes. It's about chemistry, not sweetness.
Myth: You must sear meat to "seal in juices." Truth: Searing doesn't actually seal anything. Moisture loss happens throughout the cooking process. The sear is purely for flavor, creating those toasted, nutty notes that define a great wendys chili copycat recipe stovetop.
Myth: Canned beans are "cheating." Truth: For this specific style of chili, canned beans provide a consistent texture and a faster start. Soaking dry beans takes hours and can sometimes result in a grainier texture.
Storage Guidelines
Chili is one of those rare dishes that actually tastes better the next day. This is because the flavors continue to meld and the starches settle.
Fridge and Freezer Store your chili in airtight containers in the fridge for up to 4 days. For longer storage, this freezes beautifully. Let it cool completely before freezing to avoid ice crystals. It will stay fresh in the freezer for up to 3 months.
Zero Waste Tips If you have leftover beef broth or a few stray carrots/celery stalks, toss them into the pot during the simmer. If you have a bit of chili left that isn't enough for a meal, use it as a topping for baked potatoes or stir it into some macaroni for a quick "chili mac."
How to Serve and Enjoy
The way you serve this makes a huge difference. Since the wendys chili copycat recipe stovetop is so rich and thick, you want toppings that provide contrast something cool, something crunchy, or something sharp.
I always recommend a dollop of full fat sour cream and a handful of sharp cheddar cheese. The cold cream cuts through the heat of the cumin and chili powder. For a bit of crunch, some diced raw white onions or sliced jalapeños are a must.
To round out the meal, I usually serve this with my garlic flatbread to scoop up every last drop of the sauce. If you want to keep it classic, just go with a side of buttery corn muffins.
The Perfect Bowl Setup 1. Ladle the thick chili into a deep bowl. 2. Add a centered dollop of sour cream. 3. Sprinkle shredded cheddar in a ring around the cream. 4. Finish with a pinch of fresh chives or green onions for a pop of color.
The result is a hearty, stress free meal that feels like a hug in a bowl. Just remember: trust the simmer, don't rush the beef, and keep that heat low. Enjoy!
Recipe FAQs
How to thicken chili that is too watery?
Remove the lid entirely for the final 30 minutes of cooking. This increases evaporation, allowing the sauce to reduce into a thick, glossy consistency.
How to get the beef to a deep mahogany sear?
Heat a Dutch oven or heavy bottomed stockpot over medium high heat. Cook the ground beef undisturbed for a few minutes before breaking it up to ensure a rich, dark crust.
Can this chili be frozen for later?
Yes, it freezes beautifully for up to 3 months. Just ensure the chili cools completely before sealing it in airtight containers to avoid ice crystals.
Is it true that you must use a slow cooker to achieve this flavor?
No, this is a common misconception. A stovetop simmer for at least 2 hours provides the same flavor melding and starch settlement as a slow cooker.
How to bloom the spices without burning them?
Stir the seasoning blend constantly for exactly 60 seconds. This brief window toasts the spices to release their aromatic oils before the liquids are added.
What to do if the chili tastes too acidic?
Stir in a pinch more brown sugar. This neutralizes the sharp metallic taste sometimes found in canned tomatoes and balances the overall flavor.
How to store leftover chili in the fridge?
Place in airtight containers and refrigerate for up to 4 days. For a similar hearty meal experience, you can also try our tangy sloppy joes.
Wendy S Chili Copycat Stovetop

